Can Shari Teach Me To Paint?

While the COVID pandemic generated a bunch of negatives, there have also been positives.  For instance, because Shari Blaukopf couldn’t travel or do her in-person workshops, she decided to produce a series of video watercolor workshops and made them available on her website.

I bought several of them and will probably buy more because the pricing makes them irresistable.  There’s only one problem.  Buying them didn’t make me a better painter.  And while watching the videos taught me a bunch of stuff, this didn’t improve my painting abilities much either.  Surprise, surprise.

Seems I’ve actually got to move a fuzzy stick around… a lot, if I’m going to improve and I’m not good with fuzzy sticks.  My approach to “painting” has been to do a complete pen and ink drawing and then to quickly add local color, being sure to stay “inside the lines.”  Most of the time, my paint detracts rather than enhances the original drawing. Painting Shari style isn’t like that at all (grin).

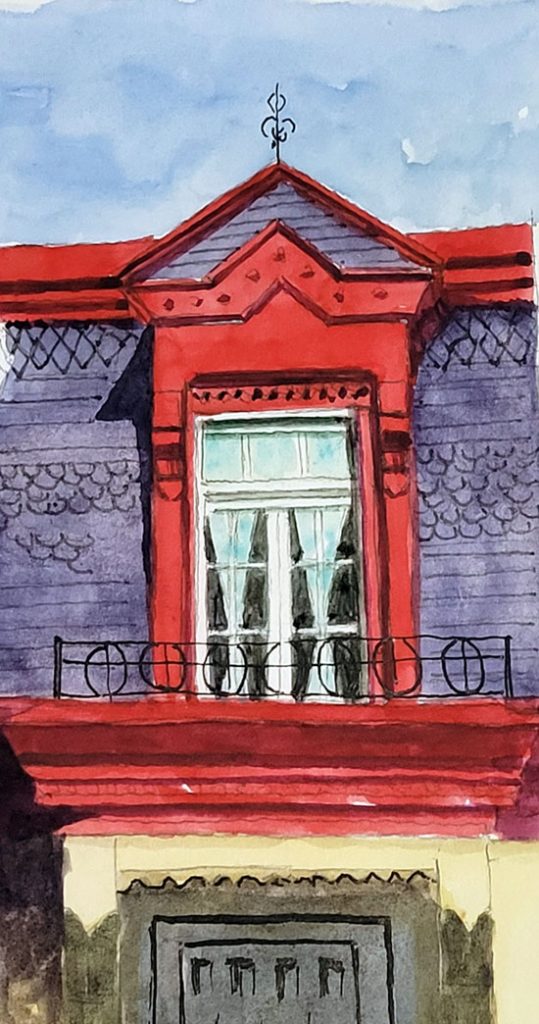
Shari starts each of her workshop studies with a pencil, drawing outlines of the major components.  I’m not much of a pencil-driver either, but a pointy stick is a pointy stick and so I have no trouble with this step.  Here’s my first attempt at painting a Victorian window:


It’s not horrible, but it’s not even close to Shari quality.  My brushwork is sloppy.  I expected that (see above about my fuzzy stick management), but it’s the other stuff that suggests I wasn’t paying attention.

  1. Shari explains how to mix paint to the right consistency.  I was anything but consistent.
  2. Shari showed me how to create the dark red shadow color.  Mine isn’t dark enough cuz I got caught by the watercolor “drying up.”
  3. And oh my goodness.  Shari talks about painting linework with a rigger brush.  I couldn’t get a paint mix that was dark enough and yet wet enough to do it at all so I resorted to a fude pen instead.

I love how she presents these workshops, though, and with more time with my fuzzy sticks, I just might figure out how to do it.  Hope so.  Thanks to Shari for making these workshops available.  With my help I bet Shari CAN teach me to paint.

Small Figures Make Great Sketching Subjects

Lots of us are dealing with COVID isolation by sketching our backyards and stuff in our kitchens.  We’re no longer locked down and it’s pretty safe to move around because people are reasonable and we’re all wearing masks.  Still, I’m reluctant to spend much time sketching on the streets.

I took advantage of the fact that I have a collection of Schleich animal figures.  If you’re unfamiliar with them, they are very detailed and well-painted figures and each if beautifully proportioned, unlike so many of the animal figures made for kids.  I’ve bought many of mine from art stores but the satisfying ones I got for pennies at local flea markets.  Here’s a batch that Chantal gave me for Christmas.

I was about to watch a baseball game and so I grabbed my panda bear and drew him while the Blue Jays played baseball.  A great combination.  This is in my Hahnemuehle Capuccino notebook and rather than using watercolor I grabbed a black and white colored pencil to add some “color.”  Pandas are very accommodating when it comes to color.

What’s A Pencil?

When I came to sketching I’d been using fountain pens for all of my writing for decades.  It never occurred to me to use anything different to draw stuff.  So I’ve spent years using fountain pens for sketching and rarely have I tried anything else, though I’ve spent a bunch of time with watercolor pencils in museums when watercolors weren’t allowed.  But with the COVID scurge going on I’m doing more experiments.  I’m not sure why, but I think it has to do with me doing more art in isolation rather than going out with friends to sketch some location.

I was at an Artistes dans les parcs event last week.  Even here I’m mostly by myself because the language barrier prevents a lot of interaction between myself and the rest of the participants.  Anyways, I was out on the shore of the St. Lawrence River sizing up some rocks to draw.  For whatever reason I got the idea to draw them with a pencil.  I dug around in my bag and came up with a short hunk of Blackwing 602.  Here’s the result.  Another result of this experiment is the realization that I’ve never learned how to draw with a simple, graphite pencil.

Strathmore 184lb Toned Tan paper, pencil

Blackwing Sharpener Review

I just got back from a sketching trip to Montreal.  I’ll talk about that once I get a chance to scan my sketches but today I want to show you what I found while wandering around Mile End.  I went into a tiny store called Boucle & Papier.  l didn’t have high expectations as the place is full of greeting cards but they had Blackwing pencils, which was a pleasant surprise.

The BIG surprise, though, was that they had the hot topic in the pencil world right now – the Blackwing sharpener.  I was hot to get one of these but shipping costs really limit my ability to do so.  But I have one now.

Before I talk about it I need to provide a bit of sharpener history for those who are saying “it’s only a sharpener.”  In the pencil world, particularly the people that carry pencils wherever they go, have never been satisfied by the cheap sharpeners you can buy anywhere.  There are reasons for this but the big one is that these sharpeners produce a very short, high-angle tip and if you want to write/draw with a fine line, you’re constantly sharpening.  The long tip you get from a wall sharpener is what we want in our portable sharpeners.

There have been several solutions but the reigning favorite is the Kum Masterpiece sharpener, a 2-step sharpener that requires you to remove wood in the first step and then carefully sharpen the point in the second.  It works great, though the 2-step approach isn’t convenient.  More important, however, is that the shavings aren’t captured by the sharpener.

The Blackwing sharpener has come to the rescue.  If you haven’t been convinced by the cost of the thing, the packaging should give you the idea that you’re holding something special.  It impresses when you hold it in your hand as well.  Very solid and the black anodizing is beautiful.

The sharpener disassembles into three pieces.  You unscrew the top and then you can pull the actual sharpener out of the housing to empty the shavings.  The sharpener hole is offset to allow shavings to easily flake away from the blade.  Sharpening is done by simply holding it and twisting the pencil as you would with any simple sharpener.

Here’s a comparison of the results from the Blackwing and Masterpiece sharpeners.  Note that the exposed graphite length is very similar but the Masterpiece removes more wood.  The reason is that the Blackwing sharpener cuts the pencil into a curved shape similar to the Pollux sharpener that is popular with some, though the Pollux  has a reputation of being picky about what pencils it will sharpen.  I haven’t exhaustively tested different pencils but I’ve tried Ticonderoga, Blackwing, Tombow, Mitsubishi, Mars Lumigraph and even Col-Erase pencils and the Blackwing sharpener handles all of them well.

This is just a close up of the results.

In the end, this sharpener is now part of my sketching bag and I just love it.  A happy surprise from Montreal.

Edit:  Tina Koyama asked for a comparision to the Blackwing 2-step sharpener.  Here it is.  Top pencil is a Mars Lumograph sharpened with the new Blackwing and the bottom pencil is a Tombow Mono 100 sharpened with the Blackwing 2-step sharpener.

Doppelgangers, Look-Alikes and Soses

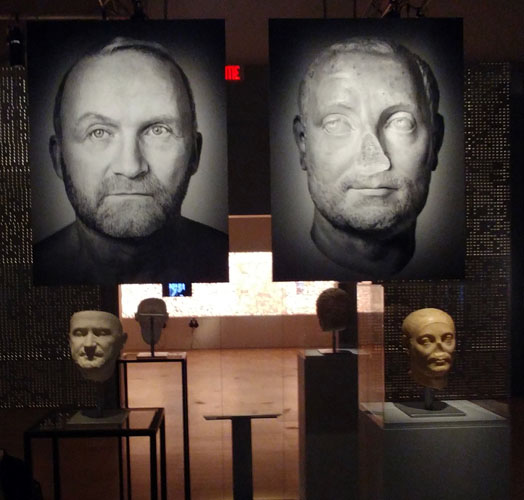
There’s a new exhibit at our Museum of Civilization that plays right into my new endeavor to learn how to use a pencil while drawing portraits.  It’s called Mon Sosis a 2000 Ans  which means, I think, My 2000-Year Old Double.  While there’s some variation in how it’s presented, most of the displays look like this one (left).  On the right is a head (or bust) from long ago and far away (many are Egyptian or Greek).   On the left is the result of scanning a person’s head and using the results to 3D print a mask of the person’s face.  The pictures above show you what the person looks like with a comparative photo of the ancient sculpture.

This presents to the sketcher an array of faces/sculptures to sketch.  The downside of the 3D masks is that the person’s eyes are closed and the top of their head is gone so there is no hairline.  Still, they don’t move which is a plus.

Here are a couple of drawings from my first batch of sketches.  I’m not very good at this but I’m determined to improve.