I’m a fountain pen geek. Not in the sense that I spend hundreds of dollars to fill out my collection of exotic pens or anything like that. But pretty much everything I write or draw on paper is done with fountain pens. Besides the fact that we’re burying our planet in disposable pens, fountain pens are economical, practical, and fun
When I started sketching I began using a Lamy Safari. They’re reliable and Lamy’s extra-fine nib is reasonably fine. The Platinum Preppy is a surprisingly good sketching pen, though their caps are fragile so I stopped relying upon them for my street sketching.
I discovered Pilot pens, first the 78G, a cheap pen that isn’t imported into North America. Then I bought a Pilot Prera and shortly thereafter I bought another one. I love Pilot Preras. Because it’s an Asian company, Pilot’s fine nib pens are much finer than are European extra-fine nib pens and the Prera is very well made.
It’s also the ‘right’ length and weight when posted. Some pens, the Lamy is a good example, become quite tail-heavy when posted. Of course, you don’t have to post a pen but when I’m on the street the problem of where to put the cap so it doesn’t get lost becomes a problem. So I like to post the pen when it’s in use. There’s one big downside of the Prera. Pilot’s piston converters have a very small capacity.
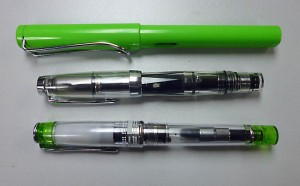
Top: Lamy Safari, Middle: TWSBI Mini, Bottom: Pilot Prera
Enter my newest pen acquisition, the TWSBI Mini. Wow…what a pen. I’m not going to do a regular pen review. For that I encourage you to watch Brian Goulet’s great video review and comparison to its big brother, the TWSBI 540. Instead, I want to talk about why I think the TWSBI Mini will become my favorite street sketching tool.
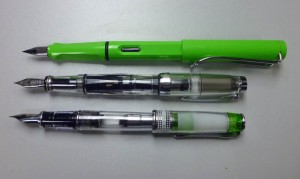
Top: Lamy Safari, Middle: TWSBI Mini, Bottom: Pilot Prera
Let’s Talk Prices
As I know many people use Lamy pens, or have had them recommended to them, maybe by me, I think I should say something about price. The Lamy is cheaper than either the Prera or TWSBI. All I’ll say is that the differences aren’t that great when you look at a pen as something you’re going to use every time you go sketching. If you look at street prices (I’ll use Goulet Pen’s pricing as my example) you’ll find these numbers:
Lamy Safari with converter: $34.55
Pilot Prera demonstrator: $56.00
TWSBI Mini demonstrator: $55.00
So, for the price of a very few lattes, you can buy some of the features I’m going to talk about here and I’ll say no more about price.
Pilot Prera vs TWSBI Mini
I’ll begin by telling you that it’s not because it’s so much better at making lines. Both the Pilot Prera F and TWSBI Mini EF produce very fine, consistent lines. The TWSBI isn’t quite as fine as the Prera and writes wetter, thus producing a bit darker line, at least with the Noodler’s Lexington Gray that I use. The TWSBI is, likewise, a bit finer than a Lamy EF pen. Both are smooth sketching pens, though my Prera is smoother. This, however, may be because I’ve been using the Prera for along time and nibs do improve with time.

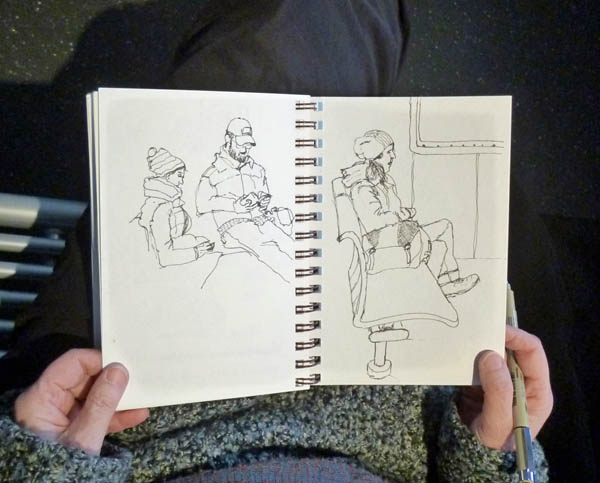
I quickly did these two small comparison sketches – the Prera F (top) and TWSBI Mini EF (bottom). These sketches are about two inches wide. The dividing line between them was done with a Lamy Safari EF for comparison. Both were done on Stillman & Birn Epsilon paper. I think they reflect the line differences/similarities of the two pens.
What makes a good street pen?
There are pen features beyond what line it draws that are important to me as a street sketcher. They are:
1) The pen must be absolutely reliable.
2) It must have a post-able cap.
3) It must not be tail-heavy when posted.
4) It must have a decent ink capacity.
5) The cap must seal well so the ink doesn’t evaporate.
6) I’ve got to be able to see how much ink is in it.
7) I simply have to ‘like’ it, whatever that means.
Let’s look at each of these things, by comparing the TWSBI Mini to the Pilot Prera.
Reliability (1)
My sketching pen has to write the first time, every time. I don’t want to have to dip it in water to get it started, or draw a gazillion little circles, shake it, or anything else to get it to work. I want to take the cap off and write. My paper/ink/pen triad is Stillman & Birn paper, Noodler’s Lexington Gray, and Pilot Prera. This combination meets that criterion.
So do my Lamy pens and the TWSBI. I have many more pens that don’t meet this criterion and it’s by far the most important to me. I hear people talk about how they ‘start’ their pens. When I have a pen that needs ‘starting’, I get a different pen. Putting the pen to paper should be sufficient. Life’s too short.
Postable and not-tail heavy (2 & 3)
This is a bigger deal than it sounds if you’re a street sketcher. If you can’t post a pen and you’re in a studio, you put the cap on the work table. When you’re sitting on a stool in the middle of a sidewalk, what do you do with it? I need a pen that posts well.
Both the Prera and Mini are short pens. They are designed to be posted and be in balance when posted. What puts the TWSBI Mini head and shoulders above the Prera in this regard is that the TWSBI posts by screwing it onto the back of the pen. There’s no chance of it falling off. It may be a small thing. Some may not even like it. But I’m downright giddy as a schoolgirl over this TWSBI feature.
Ink Capacity (4)
This is the Prera’s achilles heel and a fantastic feature of the TWSBI pens. Pilot’s piston converter holds somewhere around half a milliliter of ink. The TWSBI holds more than twice that much. I find myself filling my Preras all the time and have even taken to carrying extra ink with me. I’m going to enjoy not having to fuss over the TWSBI as often because of its larger ink capacity.
Cap Seals Well (5)
This is a big deal for me. If the cap doesn’t seal well, you get evaporation. If you get evaporation you not only lose ink volume, you increase ink concentration, affecting consistency of the pen. I have no hard data to prove it but I think there is some evaporation from my Preras. It’s also the case that a cap that doesn’t seal opens up the possibility of ink drying in the feed/nib and having the ‘start’ the pen as discussed above.
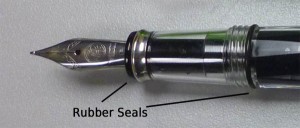
The TWSBI pens are truly amazing pieces of engineering. While the Prera cap seal depends upon a friction fit between plastic and metal pieces coming together, and is better than most fountain pens, TWSBI truly addresses the problem with a first-class solution. They provide two rubber seals and as you screw the cap on (a better seal by itself), these seals produce a two independent seal barriers between the nib/feed and the outside world. This feature alone is enough to give high marks to the TWSBI in my view.
Seeing Ink Supply
When it comes to buying pens I’m like a fish watching lures go by. I’m attracted to the bright colors. Just like the fish, I’ve learned that’s a mistake. The best pens for sketching are clear. You can see how much ink you’ve got. This is particularly true of a piston-fill pen. Though it’s a bit of a nuisance, I can unscrew my Lamy and look at the reservoir (that dumb little window is a completely failed experiment in my view). While you can take the TWSBI apart completely (a great feature by the way), you don’t do that when it’s half-full of ink and you don’t do it while you’re sitting in a park somewhere. I’ve come to love clear-body, or ‘demonstrator’ fountain pens. I do find the bright red button on the end of the TWSBI cap to be attractive, though (grin).
Gotta Like It
What’s the point of sketching if you can’t like the tools you’re using. If you like your tools, you’ll use them more often and probably get a better result. Both the Pilot Prera and TWSBI Mini are superb-writing pens that feel good in the hand. I also like the looks of them.
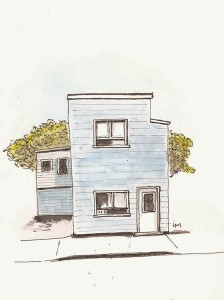
A small building sketched on Stillman & Birn Zeta paper (5×8), using the TWSBI Mini and Noodler’s Lexington Gray.
In the end, we all have to chose our own tools. There is no one-size fits all. I hope that by highlighting the TWSBI Mini, and why I feel it is a superb street sketching tool for me that you’ll gain some insight into your own choices while being introduced to this great sketching pen.


 Of course, I do have my own sketches. This first one is a small sketch I did as an experiment, which demonstrated that I didn’t know what I was doing (grin). I tried to ‘draw’ the sketch using watercolors, adding some ink lines afterwards. It was done in a Stillman & Birn Alpha (4×6) sketchbook. I have much to learn about using watercolors.
 I did two other sketches, one from the front and the other from the back of the boat. Both were done with my new TWSBI Mini and Noodler’s Lexington Gray ink. I really enjoyed working in my new Stillman & Birn Zeta (5.5×8.5) sketchbook. I hope these sketches reflect the cold, dreary day you see in the accompanying photo.


