Like for many, this summer has been wild with respect to weather. All the places on the planet who are dealing with drought need to know, all your water is over here, and falling regularly. And while that has upset a lot of our summer plans, it hasn’t been the main thing that’s kept me from sketching and posting here.
The real reason was a “little” project we needed to do. The stairs to the back of our house (onto our deck) needed to be replaced. And so it was with carefree attitudes and a good dose of “how hard can it be” that we ripped out the old with the intent of building a new set. Easy peasy. That’s when our old house became a rerun of that old movie, The Money Pit (grin).
Once removed we could see under our deck and we could see the wall on the other side of it. We could see the supports for the deck. And we could see that both were falling apart from water damage and rot. We were/are suddenly up to our armpits with big jobs that retired research scientists aren’t trained to do. Much reading and many YouTube videos later and I started to understand some of the particulars.
I won’t bother you with the details. Suffice it to say that we’ve spent July and August working hard to keep our house from falling down. I also built a new set of doors for the storage area under our deck. Finally I got to think about building stairs. MyCarpentry.com has been a big help.
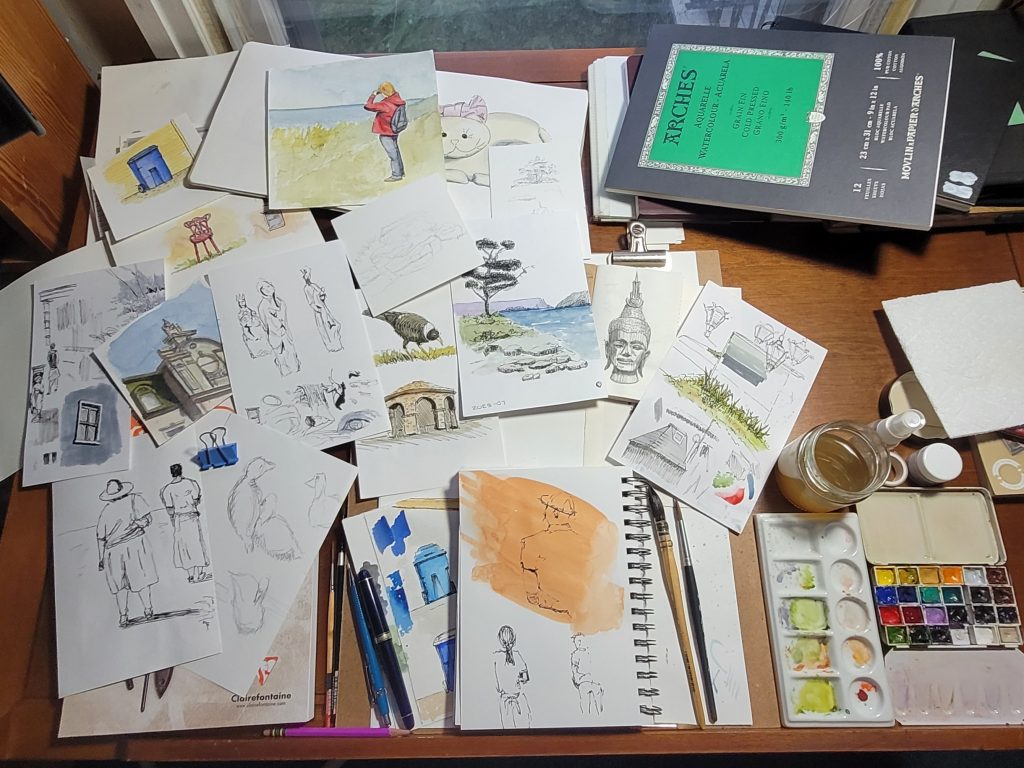
The stairs are built and with any luck, we’ll have themthose stairs and an associated wall in place within a week. Anyway, while I’ve sloshed a couple gallons of paint, none of it has been as a sketcher. I do sit and doodle sometimes, though. I spread out some of the pieces of paper strewn around my drawing table for your perusal. Wish there was more. If I can get the stairs installed I’m scheduled to attend art workshops in Montreal with Marc Taro Holmes and Shari Blaukopf as instructors. Maybe they’ll remind me how to use fuzzy sticks to apply paint to paper. I hope so. Sorry the blog has gone dark for so long.
This summer has been crazy so far. Here we’ve had heat waves, followed by lots of rain, forest fire smoke and in recent days, tornado warnings. When do the grasshopper and frogs start falling from the sky?
I’ve continued my pursuit of watercolor knowledge and expertise. They say you learn from your mistakes so I must be learning a lot. I did learn something important.. really important. If you cut up a bunch of 100% cotton paper into small squares and leave them out in high humidity, they go bad.
Well, I did that. When I started my 30x30DirectWatercolor thing I cut up a bunch of Fabriano Artistico into 5×5 and 4×6 squares, about 50 of them and just piled them on my drawing table. Mother Nature provided the humidity. Its been a banner year for humidity in Quebec.
Anyways, I spent a month struggling to get watercolor to cooperate on those 5×5 squares and only recently found that at least some of my problems have come from the sizing going bad on those squares. I couldn’t figure out why the paint would immediately soak into the paper, always had fuzzy edges, etc. Oh well.
Recently I’ve continued to pursue watercolors, this time by doing a master study of a sketch I saw in an online presentation. I’d love to tell you who did the original but I can’t find the video. Most times when master studies are discussed people are trying to replicate Zorn, Sargent, or some other great artist. That’s fun but I get more information by trying to copy some particular aspect of a person’s work. In this instance I was trying to replicate the splotchy, rusty nature of this chimney. This is actually my second attempt at it but I was pleased with the result.
I find myself doing a lot of screwy things in the name of “that might be fun” and this is one of them. I wander thrift shops looking for statues, heads on pedestals, and cast animals that I add to my stuff-to-draw collection and I was in the process of doing just that when I came across a plaster cast of a head. This particular head is part of a product line produced by someone, somewhere and they pop up once in a while around here. I’ve had opportunity to draw a couple of them. They’re all about 6″ tall and meant to hang on a wall. Wish I could find more of them.
This particular example was pretty beat up with lots of scrapes, scratches and some chunks of plaster missing, most notably the tip of the guy’s nose. The price was $2 and I decided to see if I could restore it, at least to the point where I could draw it. It took far more time than it was worth to do it but it was fun and the results are acceptable to me.
I started by using a spackling compound to fill and/or build up the missing parts. I’m not sure that was a good choice but it was what I had. Then I got out a very cheap set of acrylics and went to work with a small brush. I don’t know why I have the acrylics as I’ve never used them for painting. The only tubes that had been touched were Burnt Umber and Black. My guess is that they came from Walmart (grin). But they worked ok.
One thing I learned is that a camera finds every tiny and sub-tiny white speck. I’d feel I was done and I’d take a photo only to find lots and lots of little white specks, particularly in the guy’s beard. It was hard to see them to fix them and eventually I gave up. Hope you find it satisfactory.
Wow…the past month has been crazy. Mother nature has filled Quebec air with forest fire smoke, rain storms, and brisk winds. I think it’s the smoke, but my cataracts have been causing me fits. But I just had a great time because my daughter was here for two weeks and we really had fun.
This later thing cut into my #30x30DirectWatercolor experiment and I only managed 15-17 direct watercolors, all of which were total failures as art products. In the other hand, I feel I learned a lot about watercolor and about myself so I consider the experiment a big success.
I’m reluctant to talk about this simply because I have little in the way of graphics to go with the words. I was throwing my little paintings away as fast as I was making them and thought I had only one to show you. Then I cleaned off my drawing table and found a couple rejects. Both of these were discarded long before they were finished. They describe a guy using too much water and too little patience I think. A sketcher’s tempo doesn’t fit with 100% cotton paper and high humidity because the paper takes too long to dry for my patience level. I’ve come to understand why Marc Taro Holmes often does a couple paintings simultaneously.
Here is a great example of my loss of perspective as I chase wet paint around the paper. This sort of thing is a breeze if I’ve got a pen in my hand but with a watercolor brush my limited brain power is consumed by the medium. I don’t know what to say about the other sketch except that I think I’d decided to do a “traditional” landscape but it too got out of hand, with everything blending to mud.
Here’s a tree I sketched on location. It’s horrible, I know, but if I’m on location, I want to draw a tree in a few minutes. Unfortunately the drying time of Fabriano Artistico is just too long for that purpose and everything melts together. I think in these situations, doing watercolor on Stillman & Birn Alpha paper would be better. I’ve heard Liz Steel suggest the same thing.
Most of my 30×30 experience (but not the examples shown here) was with what Marc calls “broken silhouette” painting where you sketch by knitting small shapes together. Marc, using his words, is interested in being “painterly” whereas I guess I’m more interested in a higher level of accuracy, or at least I think I do. So I’m not sure his broken silhouette approach suits my goals but I’m intrigued by it. Clearly one of my big problems with watercolor is that I still struggle with water/color mix and keeping it under control while also thinking about perspective, object sizes and relative locations.
One interesting thing is that I don’t seem to have this problem when I’m painting on top of lines and I think it’s because I’ve become invested in the sketch and it slows me down. Starting with watercolor causes me not to care whatever e outcome is and so rushing along down the road is what I do.
Truth is, I like to draw stuff with pointy devices. That’s where “fun” is for me in art, not in watercolor. I know that most people see the color as the fun and the drawing just a means to get there but for me, without the sketching I might as well be painting a house.
I hate “challenges” but I found this one to provide some technical training and lots of food for thought about what’s important, or not, to me. Thanks Marc, for doing this every year. Maybe by next year I’ll have it figured out (grin)
While I’m babbling I thought I’d present an exercise I do regularly. I see it as a way to improve/maintain my ability to draw accurately something I’m looking at and also to locate disparate entities in a scene relative to each other.
In this case I sat on a bench and looked across the path that got me there at a wall of foliage. No real “scene” existed but for my purposes that didn’t matter. I started with the lower cluster of leaves. I draw each leaf to reflect its size, shape and location, doing so as accurately as possible. After I got a bunch of those leaves drawn I chose another group of leaves (the ones higher up in the sketch and started doing the same. Emphasis was still on accuracy but also an attempt to locate that cluster relative to the first cluster. The straight tree “trunks” were my way of connecting the two clusters while looking at how well I’d done in getting everything in its place. The rest of the foliage was mostly scribbles to fill out the sketch a bit.
I do this stuff a lot because my cataracts are messing with my vision and I feel that an artist can’t work on seeing skills enough. My sketches need all the help they can get. Besides, it’s fun.
Tina just wrote this comment to my last post. I’m starting to think about using watercolors in the field again. But the whole setup part is what stalls me… I like sketching while standing, and having to attach the palette, etc. to my sketchbook or to a board crimps my style.
The old “clip the palette to your sketchbook road is full of frustration, at least it was for me. Different sketchbook sizes, left page/right page, beginning/end of book… there’s just nothing consistent about this process.
So, long ago I realized that I needed to bring my “table” along with me. Lots of people do this, using fome-core or Coroplast boards. Some clip palettes, some imbed magnets into the backing board. I’ve tried all of these methods and they work, if you’re more consistent in your sketching practice than I am. I went a different way, mounting magnets on the bottom of my palettes…all my palettes. This eliminated the need to use a metal palette. It works as well with Cotman plastic kits as metal palettes. All it takes is a little dab of 5-minute epoxy in each corner and 4 little seed magnets, like this:
Of course this requires that your backing board be made of metal (= heavy). But what if you took some very thin plywood (mine is 3mm) and used contact cement to attach thin metal? “Come on, maybe YOU can do that Larry but I don’t have any tools.”
I found, at the dollar store, a small magnet board…a REALLY cheap magnet board. It cost me $2. It was cheap because it came with a cheap plastic frame around a thin, painted piece of metal that was backed by a piece of cardboard. Oh..and they give you some crappy magnets too.
What a deal this was because it was a game changer for me. It took about 20s to pull the frame off, toss the cardboard in the trash and I was left with a perfect sheet of metal that weighed almost nothing. Some 3M77 contact cement and my board was finished. I just dumped a bunch of art books on it to keep it flat while it dried. That was at least five years ago and she’s still going strong, albeit with scratches here and there.
Because Tina is a sketchbook user and because I know she’s like me and uses different kinds of sketchbooks, I’ll skip my single-sheet approach and just show a couple sketchbook possiblities.
Notice first that I’m holding this in one hand. In fact, when I use this standing up, I also stuff a small water bottle in my right hand (I’m a lefty). Sometimes I put the sketchbook on top and the palette on the bottom; it makes no difference. Notice also that I’m holding it up at an angle. The palette doesn’t move.
Here the palette is at the bottom and I have an A6 sketchbook on top. Works the same. A caveat here. When I’m working I typically hold the board from the top and stick the bottom of the board in my belly. In this configuration I have to be careful to keep wet pans of paint from getting on my clothes.
Yesterday I showed my current small bag set up. Because I use a sandwich of Coroplast to hold my paper I find I can just shove the secondary palette cup between the Coroplast sheets and clip it. It’s extremely stable and I can walk along a trail with this set up and ready to go, though I generally dump any water before I break into my marathon trot. Because Tina likes small sketchbooks I grabbed one of my scribblers as the example here. This is a never-before-seen sketch done in the middle of winter. It was probably -20C so apologies for its crude nature.
I know these are lousy photos but this is less of a blog post and more of a conversation with Tina, and anyone else who found it interesting enough to read to this point.